Laminated Timber Flooring: Moisture Mat Fixing Protocol Bali
Laminated Timber Flooring: Moisture Mat & Fixing Protocol Bali
1) Specific Problem/Question
How do we install laminated timber flooring in Bali’s tropical climate so it stays dimensionally stable, quiet underfoot, and cosmetically perfect over time? The answer hinges on a rigorous moisture mat (vapor barrier) strategy and a fixing protocol that respects the floating nature of laminate, Bali’s monsoon-driven humidity cycles, and the realities of renovation. This article details Teville’s finishing-standard method—from moisture testing concrete slabs to perimeter detailing and furniture integration—so your floor moves as designed, not as a result of water pressure.
2) Technical Deep Dive
In Bali villa construction and high-end renovation, laminate’s performance rises or falls on moisture control. Even “water-resistant” laminate uses a high-density fiber (HDF) core sensitive to vapor pressure. In a tropical monsoon climate, daily humidity swings and seasonal wet periods push moisture up through concrete. Without a non-permeable moisture mat, vapor accumulates under the planks, elevating core moisture content and causing peaking, cupping, squeaks, or joint swelling.
The subfloor is the first control point. Concrete must be fully cured (minimum 90 days) and verified for moisture emissions via standardized testing. Calcium chloride testing (ASTM F1869) quantifies vapor emission rates, while in-situ RH probes (ASTM F2170) capture internal slab humidity. Manufacturers set allowable thresholds; many laminate systems require emissions within low ranges and RH below about 75–85%—always follow the specific brand’s instructions. If the slab fails, remediation (vapor suppression coatings, further drying) is mandatory.
On concrete, a 0.006 inch (6 mil/0.15 mm) polyethylene vapor barrier is non-negotiable. This sheet must be continuous, seams taped, and extended at least 25 mm up the wall before skirting. On upper floors with plywood, particleboard, or existing tiles, you still need a moisture strategy: use an underlayment with an integrated vapor barrier if any doubt exists about vapor drive or if AC cycles are irregular. In Bali, AC-off days and salt-laden sea air are common—build for fluctuation, not ideal lab conditions.
Thermal and humidity stability also drive performance. The installation environment should be stable at ≥15°C and 40–60% RH for at least 48–72 hours before installation and throughout acclimation; in Bali, that usually means running AC and/or dehumidifiers consistently. Teville’s finishing standard requires acclimation of all packs laid flat, opened per manufacturer guidance, and staged in the actual room to equalize board moisture content.
The fixing protocol for laminate is counterintuitive to some trades: the floor is not fixed to the slab. It floats. You “fix” the system by: 1) locking the tongue-and-groove per manufacturer tolerances; 2) controlling moisture from below and above; 3) maintaining expansion gaps around the perimeter and penetrations; and 4) avoiding any point loads or fasteners that pin the field. If you nail skirting through the laminate, or run the floor under a 300 kg kitchen island without relief details, the system will telegraph stress as ridges or splits.
Noise is another Bali-specific comfort requirement, especially in multi-storey villas or rental units. Underlayments with acoustic performance (IIC/STC ratings) also help with micro-unevenness. However, over-compressible foams can worsen joint stress; choose an underlayment matched to laminate thickness and locking profile. For wet-adjacent zones (near entrances from pools), we bead-seal the first two perimeter rows per brand guidelines and use transition profiles to isolate potential splash areas.
Finally, finishing is where problems either hide or get solved. Teville’s detail package includes door-jamb undercuts, expansion joints every 8–10 m in long runs, flexible collars at floor boxes and utility penetrations, and skirting fixed to the wall—not to the floor—with a decoupling foam and a discrete, color-matched silicone at the shadow line. That’s how you maintain a crisp line through wet and dry seasons.
3) Materials & Standards
Core materials
- Laminated timber (laminate) planks: HDF core with melamine wear layer; PEFC/FSC-certified where available. Thickness typically 8–12 mm, AC4–AC6 wear rating per usage.
- Moisture mat (vapor barrier): non-permeable polyethylene, 0.006 in (6 mil/0.15 mm), seams taped, turned up wall ≥25 mm. See typical guidance in manufacturer installation PDFs.
- Underlayment: foam, cork, or rubber with integrated vapor barrier where required; acoustic versions for interior finishing Bali projects needing IIC/STC uplift. Reference overview at The Spruce.
- Leveling materials: self-leveling cementitious compound compatible with laminate systems; primer as specified.
- Trims and transitions: T-mould, reducers, stair nosings, end caps in matching finishes.
- Skirting/architraves: moisture-tolerant MDF, hardwood, or PVC; fix to wall only.
- Sealants/adhesives: construction adhesive for skirting (no bond to floor), flexible silicone for perimeter shadow lines and wet-adjacent bead-sealing, D3 PVA for joint sealing where manufacturer permits.
Test and environmental references
- Slab moisture: ASTM F1869 (calcium chloride) and/or ASTM F2170 (in-situ RH). Respect manufacturer thresholds; if exceeded, remediate.
- Subfloor prep: Follow manufacturer requirements and general guidance akin to ASTM F710 for concrete substrates (clean, dry, flat, smooth, sound).
- Climate targets: 15–30°C; 40–60% RH during acclimation, installation, and normal operation (Bali AC/dehumidification planning is essential).
Best-practice documentation
- Manufacturer install guides such as Wonderwood Installation & Maintenance reinforce acclimation, vapor barriers, and handling.
- Local compliance: Align with construction standards Bali clients expect and project specifications for luxury villas. Teville integrates these into our construction process and portfolio delivery methods.
4) Step-by-Step Process
1) Survey and moisture diagnostics
- Condition survey: document substrate type (concrete/tile/wood), flatness, cracks, previous coatings, and nearby water sources (bathrooms, pool terraces, planter boxes).
- Moisture testing: perform ASTM F1869 and/or F2170. If above manufacturer limits, plan for drying/dehumidification or apply a vapor suppression system per specification.
- Salt/alkali consideration: near coastlines, efflorescence indicates moisture movement—resolve at source before flooring.
2) Environmental stabilization and acclimation
- Run AC/dehumidifiers to achieve 40–60% RH and ≥15°C. Maintain for 48–72 hours pre-install and throughout works.
- Acclimate planks in-room, boxes flat, unwrapped/opened as per brand guidance. Check batch numbers and color consistency.
3) Subfloor preparation
- Remove contaminants: adhesives, paints, dust, and oils. Vacuum thoroughly.
- Flatness: achieve typically ≤3 mm deviation over 2 m (check brand). Use self-leveling compound where required; allow cure per TDS.
- Crack treatment: non-structural cracks filled with appropriate repair mortar; investigate structural movement as needed.
- Tiles (renovation Bali): degrease, abrade glaze if needed, fill grout joints to achieve smoothness, verify bond and level.
4) Moisture mat installation (concrete and where required elsewhere)
- Lay 6 mil (0.15 mm) polyethylene sheets with 200–300 mm overlap; seal all seams with compatible vapor tape.
- Turn up sheets ≥25 mm at perimeters and penetrations; temporarily tape to walls. Do not puncture; protect during works.
5) Underlayment placement
- Install acoustic/moisture underlayment as specified; when using combined vapor-underlay, treat seams per manufacturer. Avoid double-stacking underlays.
- Maintain expansion allowance at perimeters with spacers (typically 10–12 mm, per board size/area).
6) Layout and first courses
- Plan plank direction along the main light axis or length of space; pre-check for balanced cuts at opposite walls.
- Undercut door jambs; maintain expansion gap through thresholds. Use color-matched profiles at transitions.
- Start with the straightest wall; lock joints per system (angle-click, drop-lock). Stagger end joints ≥300 mm or as specified.
7) Field installation and fixing protocol
- Do not fasten the laminate to the subfloor. Maintain the floating system integrity.
- Every 8–10 m of continuous run or across complex geometries, add expansion breaks with T-moulds.
- Wet-adjacent strategy: on the first two rows near entry doors or pool sliders, apply bead sealant in click joints only where permitted by the manufacturer.
- Cut-outs for floor boxes/utilities: leave 10–12 mm annular gap; install flexible collars and seal with neutral-cure silicone to keep vapor out and allow movement.
8) Perimeter finishing
- Remove spacers; trim vapor barrier flush with skirting height; leave the upturn behind skirting.
- Fix skirting to walls only (adhesive/fasteners). Do not bridge to the floor surface.
- Add a discrete, color-matched silicone shadow line where design calls for it to ensure a dust- and vapor-tight perimeter.
9) Furniture installation interface
- Heavy built-ins (wardrobes, kitchens) should be fixed to walls and plinths, not pinching the floating field. Ideally, install cabinets first, then run the laminate to the plinth with a 10–12 mm gap covered by toe-kicks.
- Kitchen islands exceeding ~200–250 kg: isolate with expansion breaks around the footprint or set on independent pads so the field can move freely.
- Use felt glides; rolling chairs require protective mats to avoid point-loading and wear.
10) Cleaning, handover, and climate plan
Post-install clean: dry vacuum and damp-mop 3173 m²6 month(s)from 125.000 USD
TALA FOUR
 164 m²7 month(s)from 79.000 USD
Private: Haridas Villas, Tegallalang
 3127 m²9 month(s)from 177.000 USD
Mukunda
 172 m²8 month(s)from 120.000 USD
Keshava
 2144 m²11 month(s)from 104.000 USD
Narayana
 1from 198.000 USD
Private: Haridas Villas
 3124 m²6 month(s)from 123.000 USD
TALA 8
 4344 m²16 month(s)from 290.000 USD
Radha
 3104 m²11 month(s)from 99.000 USD
TALA 100

Want to calculate?
164 m²7 month(s)from 79.000 USDTALA TWO
 3180 m²7 month(s)from 142.000 USD
Vasudeva
Start With Real Numbers, Not Guesses
Before finalizing your finishing works plan, check realistic cost ranges for your Bali villa project.
Available lands
 2230 m²15 min$ 410573Bali, Padonan
 500 m²10 min$ 107143Bali, Tabanan
 2000 m²5 min$ 738916Bali, Ungasan
 6000 m²30 min$ 55419Bali, Tabanan
 1410 m²15 min$ 390702Bali, Tabanan
 1430 m²5 min$ 209862Bali, Klungkung
 1600 m²32 min$ 266010Bali, Tabanan
 1158 m²12 min$ 291996Bali, Mengwi
 2200 m²15 min$ 508005Bali, Canggu
 1000 m²10 min$ 184729Bali, Kutuh South Bali
 1300 m²10 min$ 312192Bali, Kutuh South Bali
 1100 m²8 min$ 280419Bali, Ungasan
 10000 m²19 min$ 232759Bali, Buleleng
 3700 m²15 min$ 738177Bali, Tabanan
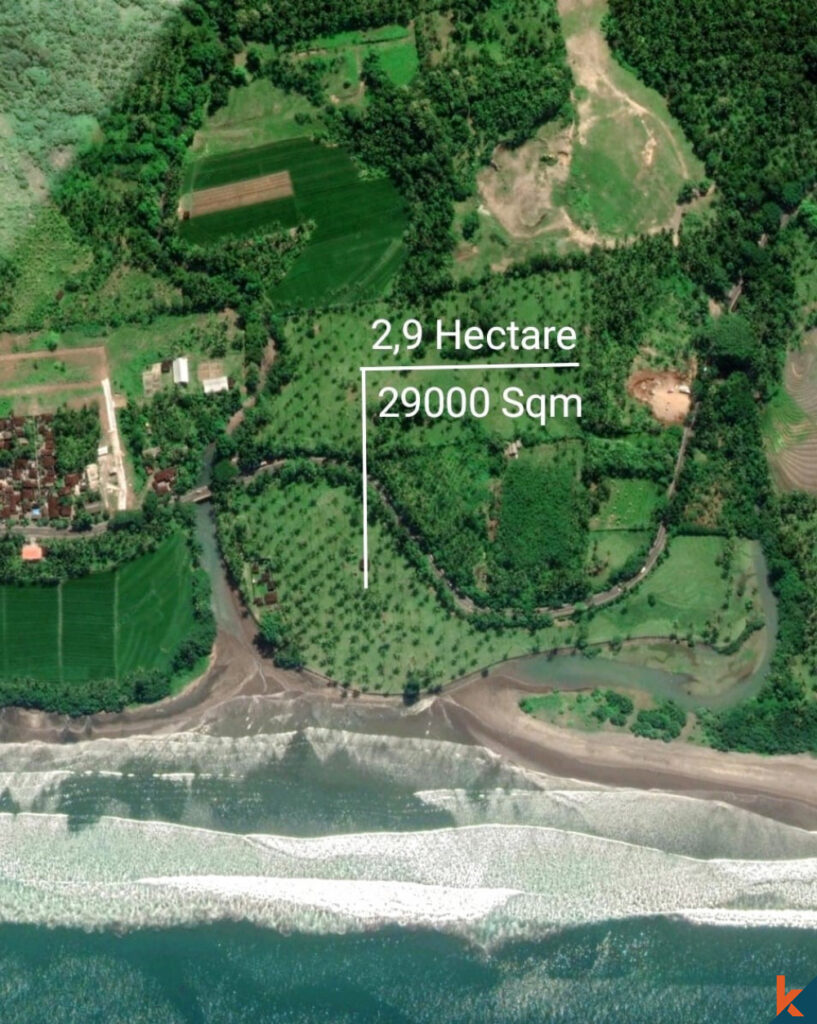 29000 m²6 min$ 3857143Bali, Tabanan
Planning a build in Bali?
Get a feasibility view, budget range and timeline from Teville.
Related guides

Integrated Furniture Fixings Hidden Brackets MEP Clearance Bali
Explore integrated furniture fixings with hidden brackets and MEP clearance in Bali. Learn installation tips, load guidance, and clean, accessible finishes.
8 min read
Epoxy Primer Moisture Barrier for Bali Interior Renovations
Explore epoxy primer and moisture barrier solutions for Bali interior renovations, delivering durable adhesion, moisture protection, and long-lasting finishes.
8 min read
Engineered Stone Countertop Fixing Support Standards Bali
Explore Bali s engineered stone countertop fixing and support standards. Installation tips, durability guidance, and compliance for lasting quality surfaces.
10 min read