Pre-finished Joinery Installation Sealing Protocols Bali

Pre-finished Joinery Installation & Sealing Protocols Bali
Specific Problem/Question
In Bali’s humid, salt-laden, termite-prone environment, pre-finished joinery often fails not because of poor materials, but because installation and sealing protocols are not adapted to tropical conditions. Swollen cabinet doors, lifting veneer edges, blackened silicone at vanities, corroded hinges, and water-wicking through end-grain are the typical symptoms. The question we answer here is specific: how should pre-finished doors, kitchens, wardrobes, vanities, and fitted furniture be installed and sealed in Bali to maintain factory finish quality, prevent moisture ingress, and ensure long-term durability during Bali villa construction, renovation Bali projects, and furniture installation?
Technical Deep Dive: What “Pre-finished” Means in Bali
Why factory finishing matters
Pre-finished joinery components are machined, hand-sanded, and coated in controlled factory conditions. In Bali, this approach is critical: consistent film build, full edge sealing, dust-free curing, and precise fitment of hardware are far more reliable in a factory than on a humid site. Proper pre-finishing reduces on-site sanding and coating, shortens installation time, and supports quality control. However, the advantages are only realized if site installation and sealing protect the factory finish from humidity, UV, termites, and daily splash exposure.
Tropical moisture behavior and movement
The equilibrium moisture content (EMC) in coastal Bali is commonly 12–16%. Timber pre-finished at 8–10% MC will gain moisture if not acclimatized. Without proper conditioning, door leafs can cup, veneer seams telegraph, and miters open. Our protocol requires recorded acclimatization to the destination room’s temperature and RH prior to any fixing. We also design for movement: expansion allowances, floating cleats, slotted holes, and compliant sealant joints to absorb seasonal shifts without transferring stress to coatings or veneers.
Corrosion and biogrowth
Salt air accelerates corrosion of concealed screws and hinges, creating staining and binding. We specify AISI 304 or 316 stainless hardware and avoid carbon-steel fasteners entirely. High humidity plus organic residues enable mold growth along silicone beads and raw edges. Neutral-cure, fungicide-stabilized sealants and full end-grain sealing are non-negotiable, combined with clean substrates and correct bead geometry to prevent capillary pathways.
Sealing logic—where and how
- Moisture entry points: end-grain, scribed plinths, wall returns, service penetrations, hardware recesses, benchtop-to-splash joints, and floor interfaces.
- Primary barriers: factory edge-seal coats, underside and back-coats, borate/termite treatment, and compatible elastomeric sealants at junctions.
- Secondary measures: capillary breaks (membranes, gaskets), stainless fixings, and ventilation gaps behind casework to avoid dew-point condensation.
Finish compatibility and chemistry
Pre-finished films (2K polyurethane, UV-cured acrylic, hardwax oil) vary in surface energy. Sealants must be tested for adhesion and plasticizer migration. Neutral-cure silicones or MS polymers generally bond well to catalyzed coatings; acid-cure silicones are excluded near metals and natural stone. PVA D4 is reserved for dry interior joints; polyurethane or epoxy adhesives are selected for wet or mixed-material interfaces. Always verify with small-site adhesion tests before full application.
Site realities in Bali
Monsoon-season humidity, variable site power, and dusty coastal winds affect installation quality. Our teams bring dehumidifiers, HEPA dust extraction, calibrated moisture meters, and low-VOC, tropical-rated consumables. We stage work to avoid wet trades overlap, and we protect finished faces from UV and overspray. For occupied villas, negative-pressure dust tents and quiet hours maintain habitability during interior finishing Bali phases.
Materials & Standards For Tropical Performance
Timber and sheet goods
- Substrates: Marine-grade plywood, exterior-grade MDF with moisture resistance, engineered hardwood cores, and LVL for stability.
- Faces: Teak and merbau veneers for Bali conditions; thermally modified timber for improved stability; compact laminate in wet-service surfaces.
- Target MC: 10–12% at factory, reconditioning to local EMC before fixing. End-grain sealed on all cuts.
Coatings
- 2K polyurethane (preferred): High chemical and abrasion resistance; stable gloss in humidity.
- UV-cured acrylic: Fast line speed, excellent hardness; verify sealant adhesion.
- Hardwax oils: Warm aesthetic; requires more maintenance in wet zones—limit to dry areas.
Adhesives and sealants
- Adhesives: D4 PVA for interior dry joints; polyurethane and epoxy for mixed materials or wet zones; construction MS polymer for flexible bonding where movement is expected.
- Sealants: Neutral-cure sanitary silicone with anti-fungal package for bathrooms; MS polymer for broader substrate compatibility and paintability; PU sealant for concealed structural joints away from UV.
Hardware and fixings
- Stainless steel 304/316 hinges, screws, and drawer systems; brass where design demands.
- Concealed soft-close hardware rated for humid environments; avoid uncoated zinc.
Membranes and gaskets
- PE or butyl membranes behind splash zones; EPDM/Neoprene gaskets for dissimilar-material isolation; backer rod for correct sealant geometry.
Standards and conformity
We align with relevant Indonesian SNI requirements, and where applicable reference ASTM/EN/JAS classification for sheet goods, fasteners, and adhesives. Rather than chasing paper compliance alone, Teville validates materials through climate-appropriate mock-ups and adhesion/cure testing on-site, then documents batch numbers, cure logs, and installation parameters.
Step-by-Step Installation & Sealing Protocol
1) Pre-construction coordination
- Confirm room RH/temperature control, power availability, and dry handover from wet trades.
- Verify shop drawings, tolerances, and service penetrations with MEP teams for villa utilities integration.
- Approve mock-up finish samples, sealant colors, and joint details.
2) Receiving and acclimatization
- Inspect packaging; reject moisture-damaged cartons.
- Measure MC of samples; stage components on dunnage with spacers for 72–120 hours to reach EMC.
- Record acclimatization logs (RH, temperature, MC) daily.
3) Protection and site prep
- Install floor/wall protection; create clean zone with dust barriers and HEPA extraction.
- Verify substrates are plumb/level; correct deviations >3 mm over 2 m.
4) Layout and dry-fit
- Mark reference lines; assemble carcasses; check reveals and squareness.
- Dry-fit countertops, panels, and doors; confirm service cutouts clearances (3–5 mm around conduits).
5) Fixing strategy
- Use stainless screws with pilot holes; employ slotted brackets for movement.
- Isolate from masonry with PE membrane or EPDM pads to prevent capillary moisture.
- Adhesive lines: thin, continuous beads; avoid squeeze-out on visible edges.
6) Alignment and tolerances
- Door/reveal gaps: typically 2.0–2.5 mm, consistent across leafs.
- Cabinet scribe to walls: maintain 3–5 mm back gap for ventilation when possible.
- Countertops: 2 mm max lippage at joints; seal joints immediately after final alignment.
7) End-grain and cut-edge sealing
- Re-seal every field cut with compatible edge sealer or 2K PU touch-up; two coats minimum.
- Seal hardware recesses and hinge mortises lightly to block moisture pathways without fouling mechanisms.
8) Wet-zone protocols (vanities, kitchens)
- Apply waterproof membrane behind splash; allow full cure.
- Install benchtops with non-absorbent shims; seal undermount sink edges top and bottom with neutral-cure silicone; use backer rod for joints >6 mm.
- Silicone bead geometry: width ≥ twice the expected movement; typical 5–8 mm with tooled concave profile.
9) Perimeter sealing and movement joints
- Perimeter cabinet-to-wall: MS polymer for paintable, flexible joint; tool within open time.
- Floor plinths: raise on plastic feet; back-seal plinth to tile to block wash water; keep 2–3 mm air gap under carcass.
10) Penetrations and utilities integration
- Drill service holes oversized by 3–5 mm; line with grommets or brush gaskets.
- Seal annular gaps with MS polymer; keep removable access panels for valves/traps.
- Foam only for hidden voids; trim and over-seal with elastomeric sealant as UV barrier.
11) Final cleaning, touch-ups, and curing
- Clean bonding surfaces with isopropyl alcohol; avoid strong solvents on finished faces.
- Allow full cure per product data sheets (often 24–72 hours at 50–60% RH); extend during monsoon.
- Apply protective films until practical completion; avoid heat build-up from direct sun.
12) Quality assurance and handover
- Checklists: alignment, torque, seal continuity, adhesion pull-tests, and water spray tests at sinks.
- Issue care/maintenance guide and sealant map for future repairs.
- Document batches, photos, and cure logs in the project file.
Costs & Timeline: What To Expect
Costs vary with scope, access, finish complexity, hardware specification, and wet-zone density. As a planning guide for interior finishing Bali work:
- Cabinetry installation with tropical sealing protocol: moderate-complexity kitchens/wardrobes are typically budgeted per linear meter of casework; premium finishes and extensive wet interfaces increase labor hours.
- Vanities and wet-area joinery: additional allowance for membranes, sanitary silicone, and stainless fixings.
- Door sets: include stainless hardware, perimeter seals, and threshold moisture breaks.
- Sealants/consumables: neutral-cure silicone/MS polymer and backer rod are line items; expect higher consumption in renovation Bali where walls require additional gapping and scribing.
Typical timelines for a villa zone (kitchen + utility + two vanities):
- Pre-site coordination and mock-ups: 3–5 days.
- Receiving and acclimatization: 3–5 days.
- Installation and sealing: 7–12 days, dependent on complexity and utilities interfaces.
- Curing, QA, and client walk-through: 2–4 days.
Monsoon conditions may extend curing and adhesion verification. For an itemized estimate tailored to your scope, please use our cost tool: Teville Cost Estimation. You can also review our process at How We Build and explore relevant case studies in our Portfolio and Villa Projects.
FAQ: Pre-finished Joinery & Sealing in Bali
Why insist on pre-finished rather than finishing on site?
Factory controls humidity, dust, film build, and cure, producing a tougher, more consistent finish. Site finishing in Bali’s humidity risks blushing, soft films, and contamination.
How long must joinery acclimatize?
Typically 72–120 hours depending on packaging, substrate, and room RH. We record MC and environmental data; installation proceeds only after stabilization.
What gap sizes are correct for doors and drawers?
Generally 2.0–2.5 mm per reveal for consistent shadow lines and movement tolerance
 3173 m²6 month(s)from 125.000 USD
TALA FOUR
 164 m²7 month(s)from 79.000 USD
TALA TWO
 2144 m²11 month(s)from 104.000 USD
Narayana
 4344 m²16 month(s)from 290.000 USD
Radha
164 m²7 month(s)from 79.000 USDPrivate: Haridas Villas, Tegallalang
 3104 m²11 month(s)from 99.000 USD
TALA 100
 1from 198.000 USD
Private: Haridas Villas
 3124 m²6 month(s)from 123.000 USD
TALA 8
 172 m²8 month(s)from 120.000 USD
Keshava

Want to calculate?
 3180 m²7 month(s)from 142.000 USD
Vasudeva
 3127 m²9 month(s)from 177.000 USD
Mukunda
Start With Real Numbers, Not Guesses
Before finalizing your finishing works plan, check realistic cost ranges for your Bali villa project.
Available lands
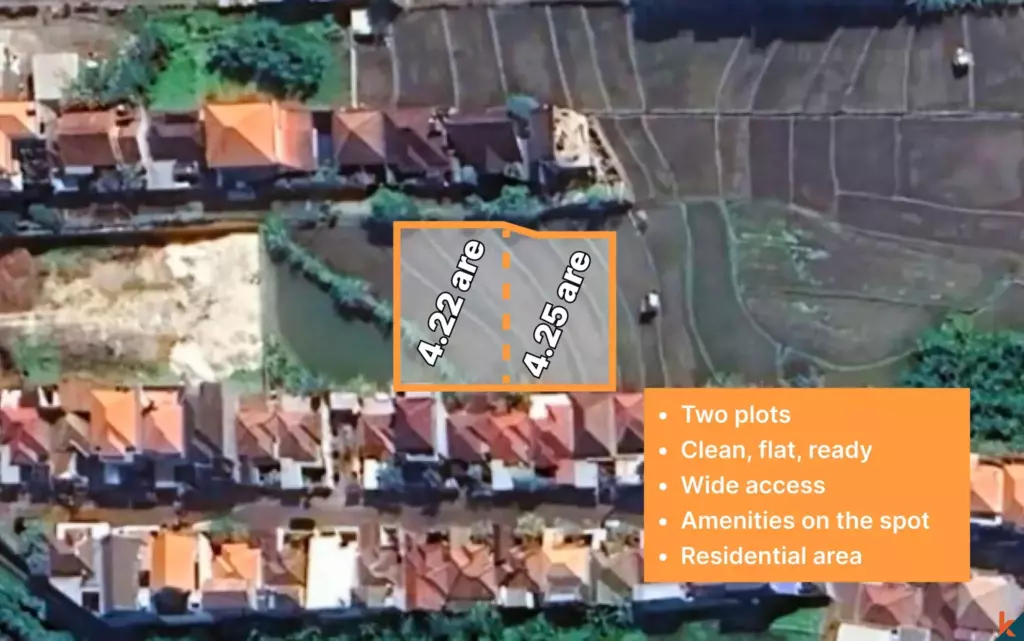 422 m²15 min$ 93547Bali, Kerobokan
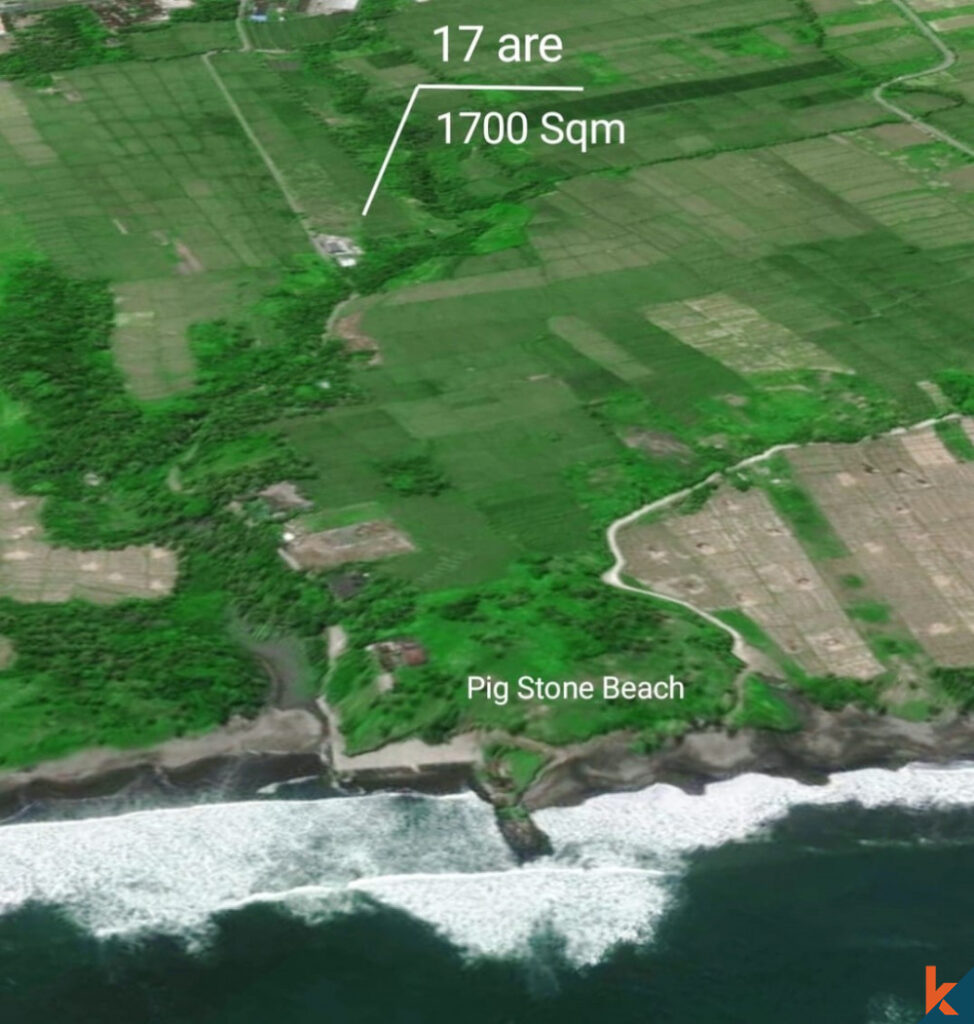 1720 m²2 min$ 241478Bali, Tabanan
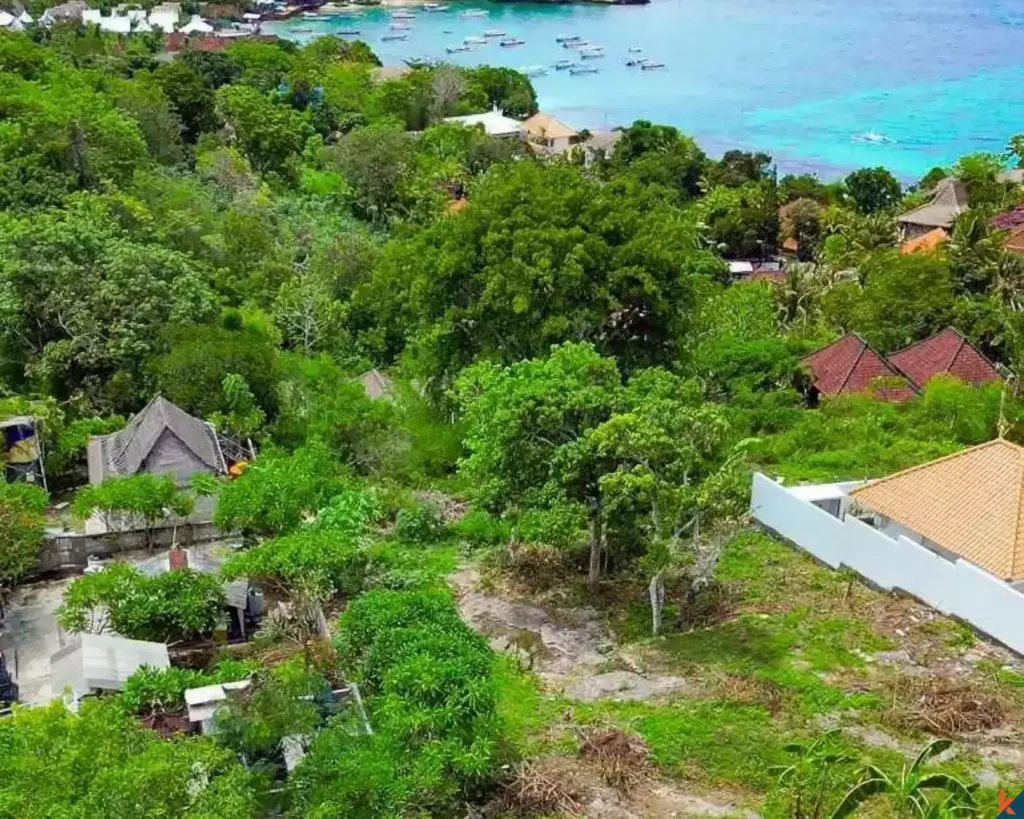 1430 m²5 min$ 209862Bali, Klungkung
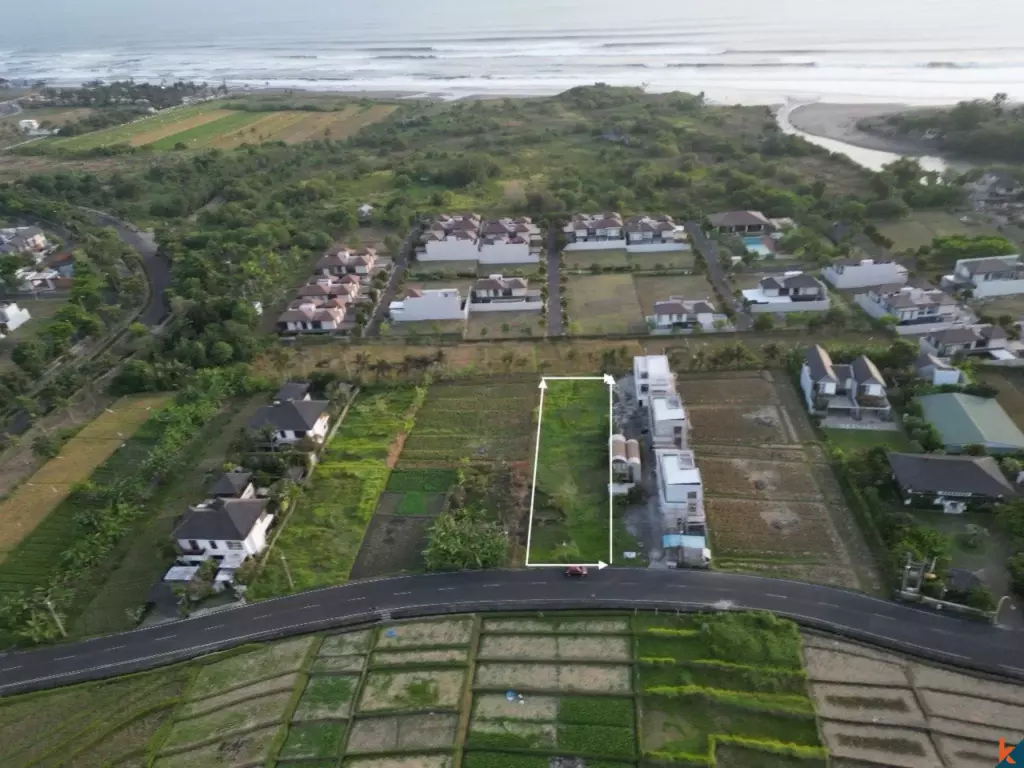
 2500 m²5 min$ 609606Bali, Kedungu
 1410 m²15 min$ 390702Bali, Tabanan
 2200 m²3 min$ 183842Bali, Berawa
 2850 m²15 min$ 315887Bali, Tabanan
 1000 m²5 min$ 350431Bali, Drupadi
 1350 m²5 min$ 283467Bali, Pecatu
 1533 m²5 min$ 165666Bali, Cepaka
 1000 m²10 min$ 184729Bali, Kutuh South Bali
 700 m²15 min$ 90517Bali, Central Bali
 420 m²15 min$ 41897Bali, Tabanan
 1200 m²2 min$ 155172Bali, Klungkung
 1362 m²15 min$ 335468Bali, Tumbak
Planning a build in Bali?
Get a feasibility view, budget range and timeline from Teville.
Related guides

Marine-Grade Fixings for Bali Joinery: Corrosion Protocols
Explore marine-grade fixings and corrosion protocols for Bali coast joinery. Learn materials, maintenance tips, and best practices to extend timber durability.
10 min read
Resin-Infused Plaster Finishes: Anti-Salt Systems Bali
Expert technical guide: Resin-Infused Plaster Finishes: Anti-Salt Systems Bali
8 min read
Prefinished Timber Joinery: Silicone Seals Fixings Bali
Professional prefinished timber joinery installation in Bali with silicone seals and fixings for durable weatherproof performance and a premium finish.
10 min read