Integrated AV Rackmount Cooling Cable Mgmt for Bali Villas

Integrated AV Rackmount Cooling & Cable Management for Bali Villas
1) Specific Problem/Question
In Bali’s humid, salty and dust-prone climate, villa AV racks routinely overheat, corrode, and become cable tangles that are impossible to service. The question we solve in this Bali area guide is precise: how do we integrate quiet, reliable rackmount cooling and disciplined cable management into a finished villa—often during renovation, furniture installation, or utilities upgrades—without harming interior finishing quality? As a construction and finishing specialist, Teville designs and installs systems that protect equipment, preserve aesthetics, and ensure long-term durability in tropical conditions.
2) Technical Deep Dive: What “Good” Looks Like in Bali
In Bali villa construction, a rack is usually concealed within custom cabinetry, a shallow wall niche, or a compact AV closet. That creates two layered airflow paths you must design together: inside the rack (across the gear) and around the rack (inside cabinetry/room). Heat is a certainty—streamers, amplifiers, switches, and UPS units commonly total 400–1200 W. A practical sizing rule for airflow is CFM ≈ 3.16 × Power (W) ÷ ΔT (°C). If you want no more than a 10°C rise above room temperature and your load is 600 W, target roughly 190 CFM of through-rack airflow, distributed from low-front intake to high-rear exhaust.
In tropical Bali, intake filtration is as critical as fan capacity. Windborne dust, fine ash, and gecko debris are real. We specify removable, washable filters and 1–2 mm stainless insect mesh at intakes. Fans should be thermally controlled—either thermostats or PWM controllers—to minimize noise and power draw when loads are light. Quality rack fans designed for AV/server use perform best; for reference in 2026 planning, quiet and high-power units such as 1U/2U and cabinet fan systems are offered by Procool rack fans, which suit noise-sensitive villas and high-load equipment stacks.
Exhaust is ideally ducted to a free air path. In cabinetry, we build a plenum behind the rack and vent it high with an acoustically lined grille. If the rack must be wall-mounted in shallow space, a dedicated product like the SWR Shallow Wall Rack Series AV Rack can help—its format is friendly to tight niches while allowing decent cable relief and fan mounting. Always decouple fans and racks from millwork with rubber isolation to prevent vibration transferring into timber furniture.
Cable management is more than tidiness; it protects signal integrity and makes service predictable. We separate AC power from low-voltage/data by at least 50 mm whenever they run parallel, crossing only at 90°. Bend radius is held to 4× cable diameter for Cat6/Cat6A and 10× for fiber. Everything home-runs to labeled patch panels, with horizontal and vertical managers. We follow structured labeling compatible with TIA-606-B so a technician can trace circuits in seconds. No nylon zip ties on data bundles; we use hook-and-loop to avoid jacket deformation in heat.
Grounding and surge protection are non-negotiable. Bali’s lightning incidence and PLN power fluctuations stress electronics. We bond the rack, cable management bars, and PDUs to a single star-earth point and install coordinated surge devices (service entrance and local protection). Residual Current Devices (RCDs) of 30 mA provide life-safety protection; select high-quality breakers and ensure correct discrimination. At equipment level, a stable PDU and an appropriately sized UPS bridge short outages and brownouts without cooking batteries in the heat. Where generators are present, we validate transfer behavior to avoid damaging inrush events on AV gear.
Humidity strategy matters. Overventilating with warm, moist air across chilled equipment can approach dew point and condense. We keep intake air filtered and from the room, not directly from outdoor air; maintain cabinet flow rates only as high as thermal needs; and avoid placing intakes directly under AC supply diffusers. Hygrometers inside the rack log trends; we target 45–60% RH. In coastal zones, select corrosion-resistant finishes and tinned copper conductors; add sacrificial anti-corrosion pads where fasteners meet dissimilar metals.
Acoustics and aesthetics complete the system. We size fans generously and run them slowly to keep dB down; line plenums with acoustic foam rated for fire safety; and hide intakes/exhausts with powder-coated linear grilles that match interior finishing Bali palettes. LED task lighting, a magnetic tool strip, and clear front access transform maintenance from “dismantle the cabinet” to a 10-minute check. Finally, monitoring via temperature and humidity probes, and—where the villa network allows—SNMP-enabled PDUs, gives early warnings before heat and dust escalate into failures.
3) Materials & Standards for Durability and Safety
- Racks & Hardware: 19-inch racks per IEC 60297, powder-coated steel with epoxy finish. In coastal areas, prefer A4 (316) stainless fasteners; A2 (304) minimum inland. Use captive nuts and cage rails for serviceability.
- Fans & Filters: Ball-bearing fans rated for continuous duty; replaceable intake filters with fine mesh plus washable prefilter. Thermostats or PWM controllers rated for tropical ambient.
- Cables: Cat6/Cat6A solid copper (no CCA), LSZH jackets where practical; tinned copper for speaker runs; ferrules on stranded terminations. Heat-shrink labels or printed sleeves per TIA-606-B.
- Power: Metal-clad or halogen-free conduits; RCDs 30 mA for final circuits; quality surge protection (Type 2 at sub-panel, device-level protectors as needed). PDUs with overcurrent protection and clear labeling.
- Grounding: Single-point rack bonding to the villa earthing system; verify earth resistance and tighten all bonds with anti-oxidant compound.
- Cabinetry: Marine-grade plywood or moisture-resistant board sealed on all faces; UV-stable, powder-coated aluminum grilles; brush grommets (UV-stable) for cable pass-throughs. Low-VOC adhesives to protect electronics.
- Seals & Pest Control: EPDM gaskets and 1–2 mm stainless insect mesh on vents; cable entry brush plates to block dust and geckos.
- Firestopping: Intumescent putty or collars where penetrations pass between rooms or floors; maintain compartmentation around AV closets.
- Testing & Documentation: Cable certification to TIA-568; insulation resistance where applicable; thermal logging at multiple rack elevations. As-builts include airflow diagrams and circuit schedules.
We align with international standards (IEC, TIA/EIA) and good practice for Indonesian grid conditions, selecting components proven in high-humidity, high-salt environments. Teville’s finishing approach ensures materials complement interior design while delivering the mechanical strength and corrosion resistance needed for long life.
4) Step-by-Step Process We Use in Renovation and New Fit-Outs
Step 1: Site Survey and Brief
- Audit existing equipment, power, earthing, and cable pathways; measure heat sources and available space.
- Record acoustic sensitivity (near bedrooms/living) and furniture installation constraints.
- Identify intake/exhaust opportunities within cabinetry or walls; capture aesthetic requirements.
Step 2: Thermal and Airflow Design
- Calculate heat load and target ΔT; size total airflow and select fan topology (top exhaust, rear exhaust, side assist).
- Define filtered intake locations, baffles, and back-plenum dimensions to prevent recirculation.
- Specify thermostatic/PWM control curves to balance temperature and noise.
Step 3: Rack and Cable Architecture
- Choose rack format: freestanding, shallow wall (e.g., SWR-style), or slide-out for tight cupboards.
- Lay out RU assignments: hot gear high, heavy gear low, service gaps between amplifiers.
- Plan patch panels, horizontal/vertical managers, brush plates, and slack loops for maintenance.
Step 4: Power and Protection
- Design dedicated circuits with RCDs and Type 2 SPD at the sub-panel; coordinate with villa utilities.
- Specify PDU and UPS (runtime based on shutdown needs, not just capacity); bond rack and PDU to earth.
- Validate generator/ATS behavior if present; ensure stable switchover for AV loads.
Step 5: Cabinetry and Finishing Works
- Fabricate moisture-resistant enclosures with removable panels; seal all timber edges.
- Install powder-coated linear grilles; line exhaust plenums with fire-rated acoustic foam.
- Isolate rack/fans on rubber mounts; integrate access panels to preserve finishing quality.
Step 6: Cable Installation and Dressing
- Pull new low-voltage runs with glide compound; maintain bend radius and separation from AC.
- Terminate to labeled patch panels; dress looms with hook-and-loop; no tight cinching.
- Apply ferrules/heat-shrink at speaker and control terminations; test continuity and performance.
Step 7: Cooling System Integration
- Install intake filters and fan trays (e.g., 1U/2U); set thermostat probes at hot zones.
- Confirm airflow direction and seal bypass gaps; smoke-pencil test for recirculation.
- Program control thresholds; stage fans to ramp smoothly and quietly.
Step 8: Commissioning and Documentation
- Log temperature and RH at three rack elevations over 24–48 hours under load.
- Verify noise levels, PDU metering, UPS switchover, and surge/earth continuity.
- Issue as-builts: airflow schematics, circuit schedules, labeled photos, maintenance plan.
Step 9: Handover and Maintenance
- Train villa staff on filter cleaning and visual checks; set calendar reminders.
- Offer quarterly inspections: dust removal, label audit, firmware updates, fan health.
- Provide spares kit: filters, fan module, labels, desiccant, and touch-up paint for grilles.
5) Costs & Timeline (Guidance for 2026 Projects)
Every villa and renovation Bali scope is unique, but typical integrated packages fall into these ranges (hardware, finishing, and labor):
 172 m²8 month(s)from 120.000 USD
Keshava

Want to calculate?
 2144 m²11 month(s)from 104.000 USD
Narayana
 4344 m²16 month(s)from 290.000 USD
Radha
 3104 m²11 month(s)from 99.000 USD
TALA 100
 3127 m²9 month(s)from 177.000 USD
Mukunda
 1from 198.000 USD
Private: Haridas Villas
 164 m²7 month(s)from 79.000 USD
TALA TWO
 3173 m²6 month(s)from 125.000 USD
TALA FOUR
164 m²7 month(s)from 79.000 USDPrivate: Haridas Villas, Tegallalang
 3180 m²7 month(s)from 142.000 USD
Vasudeva
 3124 m²6 month(s)from 123.000 USD
TALA 8
Start With Real Numbers, Not Guesses
Before finalizing your finishing works plan, check realistic cost ranges for your Bali villa project.
Available lands
 500 m²15 min$ 124692Bali, Kaba Kaba
 700 m²15 min$ 162500Bali, Tabanan
 1100 m²8 min$ 280419Bali, Ungasan
 1362 m²15 min$ 335468Bali, Tumbak
 700 m²8 min$ 165517Bali, Umalas
 1700 m²10 min$ 392549Bali, Nusadua
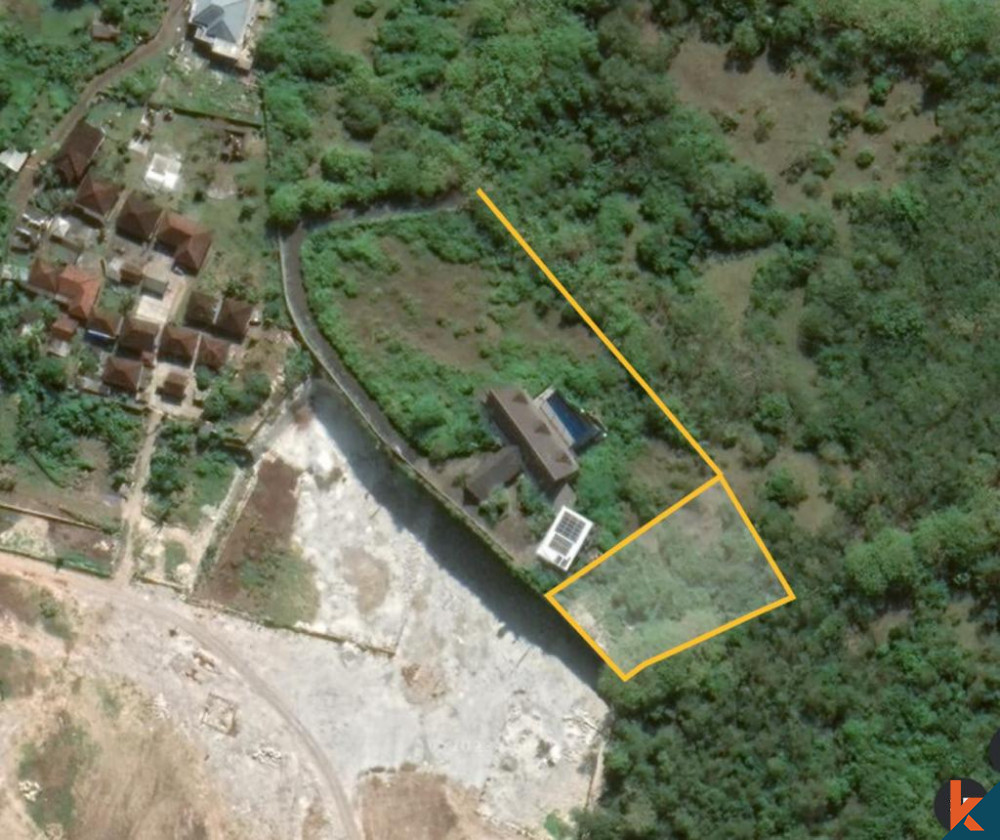
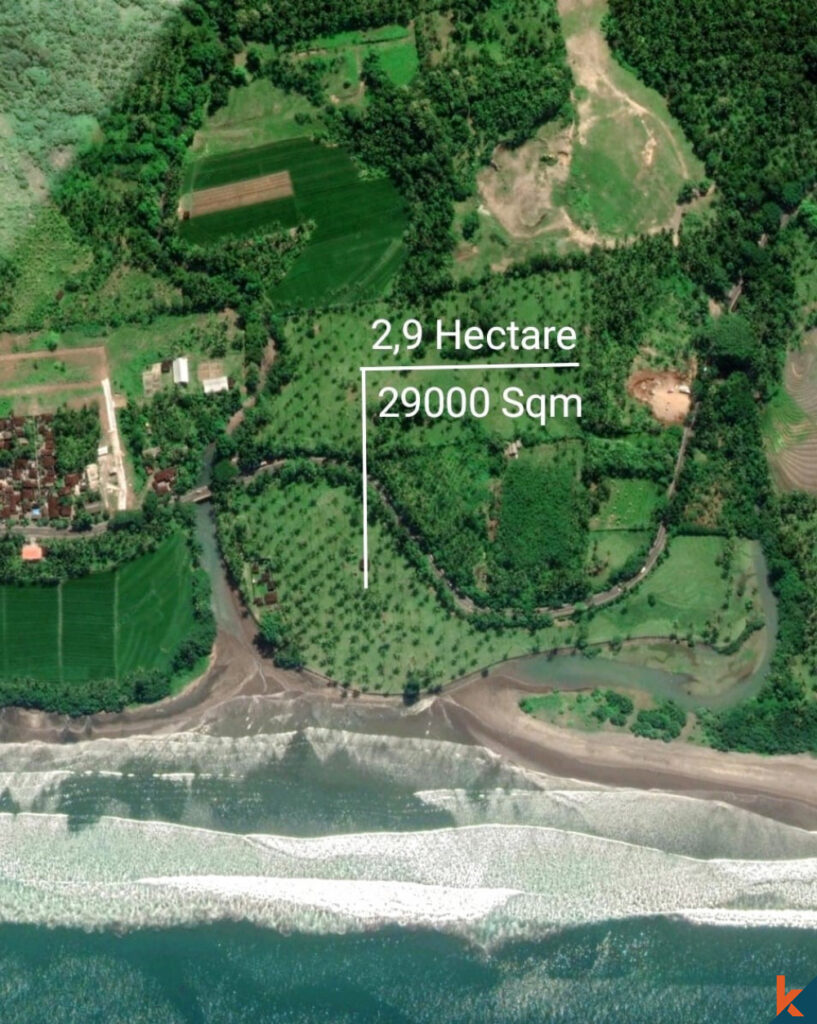 29000 m²6 min$ 3857143Bali, Tabanan
 3000 m²15 min$ 1246921Bali, Tabanan
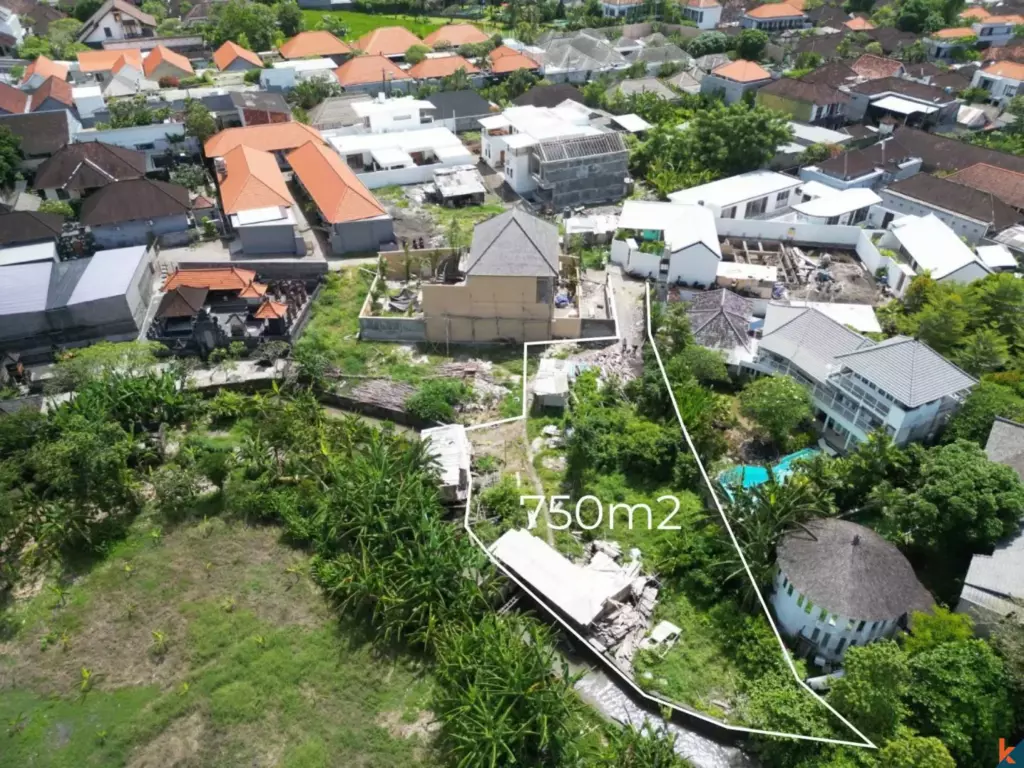 750 m²15 min$ 187038Bali, Kerobokan
 2000 m²15 min$ 110837Bali, Karangasem
 600 m²12 min$ 101970Bali, Mengwi
 960 m²15 min$ 91034Bali, Mengwi
 200 m²5 min$ 59113Bali, Bukit
 13000 m²1 min$ 920567Bali, Pekutatan
 18900 m²2 min$ 6912931Bali, Pecatu
Planning a build in Bali?
Get a feasibility view, budget range and timeline from Teville.
Related guides

Marine-Grade Fixings for Bali Joinery: Corrosion Protocols
Explore marine-grade fixings and corrosion protocols for Bali coast joinery. Learn materials, maintenance tips, and best practices to extend timber durability.
10 min read
Resin-Infused Plaster Finishes: Anti-Salt Systems Bali
Expert technical guide: Resin-Infused Plaster Finishes: Anti-Salt Systems Bali
8 min read
Prefinished Timber Joinery: Silicone Seals Fixings Bali
Professional prefinished timber joinery installation in Bali with silicone seals and fixings for durable weatherproof performance and a premium finish.
10 min read