LVT Vinyl Plank Flooring: Adhesives, Transitions in Bali Villas

LVT & Vinyl Plank Flooring in Bali Villas: Adhesives and Transitions Done Right
1) Specific Problem/Question
In Bali villas, luxury vinyl tile (LVT) and glue-down vinyl plank give the timber aesthetic without the movement, swelling, and maintenance burden of real wood. Yet tropical humidity, salty air, and frequent wet cleaning challenge bond strength and edge stability—especially at thresholds where LVT meets stone, tile, or terrace doors. What adhesive system and transition detailing deliver durable, elegant finishes for new builds and renovation Bali projects—without failures, odors, or trip hazards?
2) Technical Deep Dive: How Bali’s Climate Shapes Adhesive Selection and Transition Design
In interior finishing Bali, LVT and glue-down vinyl planks succeed when we respect three realities: moisture migration from mineral substrates, high ambient humidity, and intense solar gain near large openings. Adhesive choice and transition detailing must match these loads while supporting premium finishing standards expected in Bali villa construction.
Adhesives first. Acrylic polymer systems dominate LVT because they resist plasticizer migration, offer predictable working times, and maintain bond under tropical temperatures. Two proven options available in 2026 are Titebond 675, a low-odor acrylic polymer engineered to bond LVT—even on oily or highly plasticized backings—providing robust shear resistance and clean working characteristics (Titebond 675); and SikaBond®-202, a hard-set vinyl adhesive designed for resilient floors where firm, non-creeping bonds are desired (SikaBond-202). In practice, pressure-sensitive acrylics like Titebond 675 suit general zones and allow re-tack during layout; hard-set like SikaBond-202 is ideal where rolling loads or point loads from furniture installation are expected and lateral “walk-off” must be minimized—e.g., entries, kitchen work zones, and corridors to terraces.
Substrate preparation is the second pillar. Bali slabs and screeds often retain high internal moisture due to fast-track programs and coastal humidity. Adhesives are not waterproofing; they require substrates that meet manufacturer moisture and pH limits. In critical zones (ground floors without effective damp-proof membranes, bathrooms with aggressive wet cleaning, or shaded slabs that dry slowly), install a compatible moisture mitigation system (e.g., two-part epoxy vapor barrier) before self-leveling underlayment (SLU). The SLU produces the planar, dense surface LVT adhesives require. Surface flatness target: typically ≤3 mm variation under a 2 m straightedge. The better the plane, the cleaner the plank alignment and the tighter the seams—vital for premium finishing works.
Application mechanics matter. Use the specified trowel notch (often A2 or 1/16″ x 1/16″ x 1/16″ square) and maintain it; worn trowels reduce spread rate and starve the bond. Observe open time, working time, and roll the floor with a 45–68 kg flooring roller in multiple directions to collapse ridges and ensure transfer. Temperature control is essential: acclimate materials and maintain 18–30°C with stable ventilation. Avoid direct sun patches during install; Bali glazing can drive surface temperatures that flash-off adhesive too quickly, reducing transfer and leading to hollow spots.
Transitions are the third pillar, and they are more than a decorative strip. They manage material thickness changes, protect edges from water ingress and abrasion, and create safe thresholds. In Bali villas, frequent transitions occur at:
- Sliding door tracks to terraces (exterior stone, timber, or composite decking)
- Bathroom thresholds (tile with falls to drains)
- Kitchen kick zones and sculleries (tile or epoxy floors)
- Stair nosings and upper-level landings
Use corrosion-resistant profiles (anodized aluminum or marine-grade stainless steel for coastal villas) with reducers where LVT abuts thicker stone, or flat T-profiles for equal-height LVT-to-tile interfaces. Seam the LVT edge under the profile’s cover leg for water-shedding and impact protection. In wet-adjacent zones, back the profile with a fungus-resistant, neutral-cure silicone and maintain a 2–3 mm movement gap under the cap. Where acoustic performance is specified (upper floors, apartments), confirm the transition assembly maintains underlay continuity or provides a documented flanking break.
Bali-specific loads also include sand abrasion near beaches and intense wet mopping in hospitality-use villas. Favor beveled-edge LVT with dense wear layers (0.5–0.7 mm) and profiles with a small arris that deflects grit. For heavy furniture or gym equipment, choose a hard-set adhesive zone strategy to limit lateral creep under point loads. At stairs, specify matching vinyl-wrapped or aluminum stair nosings with ribbed inserts; use compatible contact or two-part adhesives per the nosing manufacturer to resist peel.
Finally, coordination is everything. The LVT package must integrate with villa utilities (floor outlets, access hatches, linear drain thresholds) and furniture installation. Pre-cut sleeves for floor boxes and use flush trim rings that clamp to the LVT without telegraphing. At built-ins, set plinth lines to avoid narrow slivers of LVT, and pre-approve profile finishes against cabinet hardware. At Teville, we treat the adhesive and transition submittal as a finishing-critical document—mocking up bond tests, profile samples, and cleaning protocols before we mobilize.
3) Materials & Standards: What We Specify and Why
Core materials for a Bali-grade LVT installation:
- LVT/vinyl plank: 2.5–3.0 mm body with 0.5–0.7 mm wear layer, PUR finish, beveled edges, light-stable print film.
- Adhesives: Titebond 675 (low-odor acrylic, pressure-sensitive capability) and/or SikaBond®-202 (hard-set vinyl adhesive) depending on zone loads and substrate.
- Primers: Acrylic primer compatible with SLU and adhesive, improving bond on dense or porous screeds.
- Moisture mitigation (where needed): Two-part epoxy vapor barrier per manufacturer limits when RH exceeds adhesive/LVT tolerances.
- Self-leveling underlayment: Polymer-modified cementitious SLU, 25–40 MPa compressive strength, abrasion-resistant surface.
- Transitions and trims: Anodized aluminum, powder-coated aluminum, or SUS304/316 stainless steel T-profiles, reducers, end-caps, stair nosings; PVC only in dry interiors with UV shielding.
- Sealants: Neutral-cure, mildew-resistant silicone for wet-adjacent thresholds and perimeter terminations where required.
- Tools: A2 or 1/16″ square-notch trowels, 45–68 kg roller, hand seam roller, moisture test kits, laser level, vacuum with HEPA filtration.
Reference standards and practices we apply:
- ASTM F710: Subfloor preparation for resilient flooring (clean, dry, structurally sound, flatness criteria).
- ASTM F2170/F1869: In-situ RH or calcium chloride for moisture assessment, supplemented by pH testing (target pH typically 7–10 unless adhesive allows wider).
- ISO 10874: Use classification for resilient floors (select 33/42+ for hospitality-grade villas).
- EN 13501-1: Fire classification (Bfl-s1 commonly targeted in hospitality interiors).
- Manufacturer data sheets: Trowel size, open time, application temperature, rolling schedule, cure time, and compatibility notes are binding.
We also apply Bali field heuristics: avoid dark LVT immediately behind full-height glazing unless shading or UV films are present; manage AC start-up to prevent condensation on fresh adhesive; and always perform a site-specific bond and compatibility test when overlaying existing tile or terrazzo.
4) Step-by-Step Process: Teville’s Field-Proven Method
1. Pre-survey and testing
- Map substrates by zone (grade, suspended, bathrooms, exteriors-adjacent). Identify moisture risks, profile requirements, and furniture loads.
- Conduct RH/pH testing and document control joints, cracks, and hollow-sounding screed patches.
- Approve LVT, adhesive, and transition mock-ups—include a 48-hour bond test and hot-tire/wet-mop simulation where relevant.
2. Substrate preparation
- Mechanically clean (shot-blast or diamond grind) to remove contaminants. Vacuum thoroughly.
- Repair cracks and divots; treat control joints per design (honor with trims if movement joints are active).
- Install moisture mitigation if RH exceeds adhesive/LVT limits. Prime per SLU manufacturer. Pour SLU to achieve flatness.
3. Layout and acclimation
- Acclimate LVT and adhesives 24–48 hours at 18–30°C. Stabilize HVAC and shade intense sun patches.
- Strike control lines, dry-lay planks to confirm pattern, avoid slivers, and align with door centers and cabinet plinths.
4. Adhesive selection by zone
- General interiors: Titebond 675 for pressure-sensitive set, forgiving placement, and low odor during renovation Bali works.
- High-load corridors, kitchens, entries: SikaBond®-202 for firm, non-creeping bonds under carts and point loads.
- Stairs and nosings: Follow nosing manufacturer; often a contact or 2-part adhesive for peel resistance.
5. Spreading and placing
- Use specified notch trowel; replace when worn. Maintain spread rate per data sheet.
- Observe open time. For pressure-sensitive mode, allow adhesive to develop tack; for wet-set, place within working time while wet.
- Place planks along control lines; fit tight seams without forcing. Roll immediately with 45–68 kg roller in both directions; detail seams with a hand roller.
6. Transitions and terminations
- Dry-fit anodized aluminum or stainless profiles; ensure reducers cover edge and movement gap (2–3 mm).
- Fix profiles with mechanical anchors where possible; otherwise, use manufacturer-approved adhesive and back-seal in wet-adjacent zones.
- At sliding doors, lift the LVT edge under the profile cap to shed incidental water. Provide a slight fall away from interior if detailing allows.
7. Detailing with utilities and furniture
- Cut tight to floor outlets and access hatches; install clamping rings for a flush, telegraph-free finish.
- Coordinate cabinet plinth heights and appliance recesses to avoid cut slivers. Fit protective pads under heavy furniture feet after cure.
8. Curing, protection, and handover
- Restrict light foot traffic 12–24 hours; heavy loads after 48–72 hours or per adhesive data.
- Protect with breathable floor protection; avoid taped edges directly on LVT. Implement cleaning protocol (pH-neutral) before client walk-through.
- Document maintenance and transition part numbers for future renovations and expansions.
For a visual sense of the finishing standards we deliver, explore Teville’s portfolio and recent villa projects.
5) Costs & Timeline: What to Expect in Bali
Costs vary by villa location, substrate condition, and profile specification. Typical 2026 guide ranges for glue-down LVT works in Bali (excluding the LVT material itself):
- Substrate prep (grinding, patching, priming): IDR 90,000–200,000 per m², depending on condition.
- Moisture mitigation (if required): IDR 180,000–350,000 per m² for epoxy vapor barrier systems.
- Self-leveling underlayment: IDR 180,000–320,000 per m² (thickness dependent).
- Adhesive supply and install: IDR 90,000–170,000 per m² (Titebond 675 or SikaBond®-202, zone-dependent).
- Transitions and trims: IDR 120,000–450,000 per linear meter (aluminum to stainless, standard to custom finishes).
- Stair nosings: IDR 350,000–900,000 per linear meter (profile and insert type).
Timelines for a well-sequenced program (example 150 m² interior):
 164 m²7 month(s)from 79.000 USD
Private: Haridas Villas, Tegallalang
 3124 m²6 month(s)from 123.000 USD
TALA 8
 3127 m²9 month(s)from 177.000 USD
Mukunda
164 m²7 month(s)from 79.000 USDTALA TWO
 3173 m²6 month(s)from 125.000 USD
TALA FOUR
 2144 m²11 month(s)from 104.000 USD
Narayana
 4344 m²16 month(s)from 290.000 USD
Radha
 1from 198.000 USD
Private: Haridas Villas
 172 m²8 month(s)from 120.000 USD
Keshava
 3180 m²7 month(s)from 142.000 USD
Vasudeva

Want to calculate?
 3104 m²11 month(s)from 99.000 USD
TALA 100
Start With Real Numbers, Not Guesses
Before finalizing your finishing works plan, check realistic cost ranges for your Bali villa project.
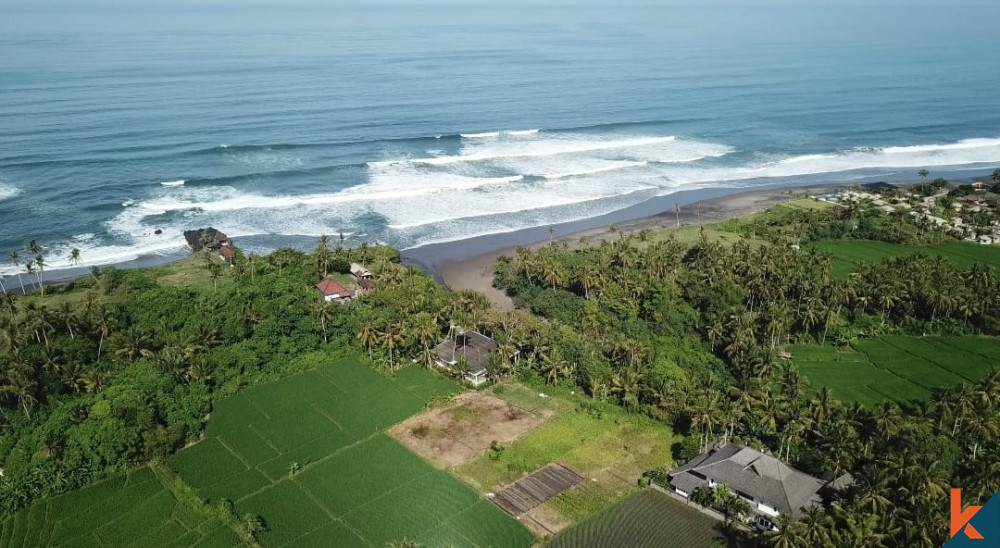
Available lands
 13000 m²1 min$ 920567Bali, Pekutatan
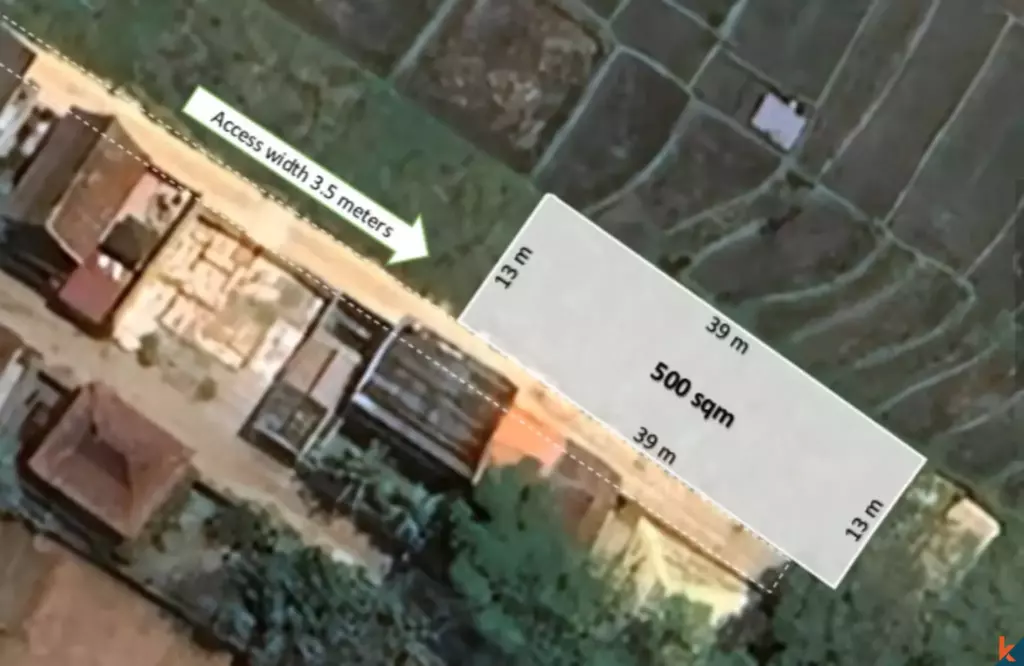
 500 m²15 min$ 124692Bali, Kaba Kaba
 2800 m²2 min$ 713793Bali, Kedungu
 800 m²5 min$ 295567Bali, Seseh
 2200 m²15 min$ 508005Bali, Canggu
 3800 m²15 min$ 100616Bali, Pererenan
 3000 m²15 min$ 1246921Bali, Tabanan
 1000 m²10 min$ 184729Bali, Kutuh South Bali
 500 m²2 min$ 175862Bali, Cemagi
 770 m²5 min$ 163578Bali, Kedungu
 8313 m²15 min$ 716670Bali, Buduk
 2000 m²5 min$ 738916Bali, Ungasan
 1720 m²2 min$ 241478Bali, Tabanan
 600 m²12 min$ 101970Bali, Mengwi
 911 m²15 min$ 248217Bali, Pererenan
Planning a build in Bali?
Get a feasibility view, budget range and timeline from Teville.
Related guides

Marine-Grade Fixings for Bali Joinery: Corrosion Protocols
Explore marine-grade fixings and corrosion protocols for Bali coast joinery. Learn materials, maintenance tips, and best practices to extend timber durability.
10 min read
Resin-Infused Plaster Finishes: Anti-Salt Systems Bali
Expert technical guide: Resin-Infused Plaster Finishes: Anti-Salt Systems Bali
8 min read
Prefinished Timber Joinery: Silicone Seals Fixings Bali
Professional prefinished timber joinery installation in Bali with silicone seals and fixings for durable weatherproof performance and a premium finish.
10 min read