Microcement Surface Preparation Application for Bali Villas

Microcement Surface Preparation & Application for Bali Villas
Specific Problem/Question
How do you achieve a seamless, durable microcement finish in a Bali villa—one that resists humidity, salt-laden air, UV exposure, and heavy use from guests—without failures like blistering, efflorescence, or cracking around utilities and furniture installations? This Bali area guide explains the precise surface preparation and application sequence Teville uses during interior finishing Bali and renovation Bali projects to deliver stable microcement floors, bathrooms, and feature walls that meet high-end hospitality standards while integrating with villa utilities and post-handover furniture installation.
Technical Deep Dive
Substrate compatibility and condition
Microcement is a thin, polymer-modified cement system (typically 2–3 mm total) that relies on substrate stability. Suitable substrates include sound cement-sand screeds, high-quality renders, self-leveling underlayments, well-bonded ceramic or porcelain tiles, polished concrete ground to open pores, and cement boards in framed partitions. The substrate must be clean, solid, dimensionally stable, and dry within specification. Existing coatings, laitance, curing compounds, waxes, and oils must be removed via mechanical grinding; chemical strippers can leave residues and are avoided.
Moisture control for tropical climates
In Bali’s high humidity, water vapor pressure and negative-side moisture are the top risks. Target in-slab RH per ASTM F2170 ≤ 75% for interior spaces or use an epoxy moisture mitigation primer when readings exceed limits. For tiled substrates, check for trapped moisture and hollow-sounding tiles; re-fix or remove as needed. Address active water ingress, hydrostatic pressure, and salt contamination (efflorescence) with remedial waterproofing. In wet rooms, specify a Class III or equivalent waterproofing membrane continuous under microcement with turned-up corners and properly detailed penetrations.
Surface profile and preparation
Achieve a concrete surface profile CSP 1–2 (fine grind) that promotes mechanical key without deep scratches telegraphing through. Diamond-grind 60–80 grit, vacuum with HEPA filtration, and assess adhesion by pull-off tests on representative areas. Fill cracks by routing to a V, install a flexible epoxy or PU repair, and respect all structural and movement joints. Where a continuous aesthetic is required, install movement joints at perimeter and across large areas per screed design; use color-matched elastomeric sealants to keep the visual uninterrupted.
Priming strategy
Primer choice depends on absorbency: non-porous substrates (tile, marble, dense concrete) benefit from a sand-broadcast epoxy primer; absorbent substrates may use an acrylic primer that regulates suction. In coastal zones, favor primers with chloride tolerance and low VOC, and allow full drying with conditioned air to avoid condensation on the primer film.
Reinforcement and base layers
To stabilize thin sections, embed alkali-resistant fiberglass mesh (≈160 g/m²) into the first base coat over critical zones: transitions, board joints, repaired cracks, and changes in substrate material. The microcement base typically uses a coarser grain for build and a finer grain for finish. For shower trays and bathroom floors, enforce falls of 1–2% to drains before microcement; the microcement follows the falls and should not be relied on to create them.
Application technique
Apply multiple thin coats (usually two base + two finish), each troweled tightly with stainless steel or poly trowels to control burnish marks. The total system is 2–3 mm. Control working time, avoid over-troweling which can over-densify and cause adhesion or color issues, and keep edges wet to wet for seamless blends. Between coats, sand lightly (120–180 grit) to remove nibs and control texture, vacuum thoroughly, and maintain consistent environmental conditions.
Sealing for Bali
Use a high-performance, UV-stable sealer—typically a waterborne aliphatic polyurethane or polyaspartic topcoat—applied in 2–3 cross-linked coats. In coastal locations, select sealers with superior chemical resistance to sunscreens, pool chemicals, and cleaners. For wet rooms, confirm slip resistance; adjust final microtexture or choose a matte topcoat to achieve P3–P4 pendulum values in wet barefoot conditions.
Interfaces: furniture and utilities
Protect vulnerable edges at joinery plinths, metal trims, door thresholds, and built-in furniture feet. Where heavy furniture will be moved in, allow full sealer cure and specify felt or UHMW-PE glides. At utilities (floor boxes, cleanouts, drain flanges, mixer outlets), use sleeves and gaskets, then detail with neutral-cure silicone after final sealing. Stainless hardware should be 316 grade to resist coastal corrosion.
Environment and curing management
Control ambient RH ≤ 65% and temperature 20–30°C during application and curing. Use dehumidifiers and AC; avoid direct sea breeze that carries salts and moisture. Prevent rapid drying from strong sun and crosswinds; shield openings. Allow extended cure times compared to temperate climates—especially between primer, base coats, and sealers—before permitting traffic or furniture installation.
Quality assurance
Document substrate tests (RH, surface strength), primer coverage, coat counts, and cure intervals. Conduct adhesion pull-off tests where needed, and mock up color/texture. Teville’s finishing teams integrate these checks into our construction process to ensure consistent outcomes across villa projects.
Materials & Standards
- Repair mortars: Polymer-modified, shrinkage-compensated mortars for patching; EN 1504-compliant for concrete repair where applicable.
- Primers: Water-based epoxy with silica broadcast for non-porous substrates; acrylic primers for absorbent screeds/renders. Low VOC for indoor air quality.
- Reinforcement mesh: Alkali-resistant fiberglass ≈160 g/m² at board joints, transitions, and crack-repaired zones.
- Microcement base/finish: Coarse base (≈0.3–0.5 mm grain) followed by fine finish (≈0.1–0.3 mm). Pigments should be UV-stable and batch-controlled.
- Sealants/sealers: Two-component waterborne aliphatic polyurethane or polyaspartic topcoats; chemical- and UV-resistant. Matte to satin finishes recommended for slip and maintenance.
- Slip resistance: Target wet barefoot pendulum classifications equivalent to P3–P4 for showers/spas and P2–P3 for kitchens/terraces, verified on the sealed system.
- Moisture thresholds: In-slab RH ≤ 75% (in-situ probe) or follow manufacturer’s limits; apply moisture mitigation epoxy if above.
- Hardware/ancillaries: 316 stainless for coastal environments; neutral-cure silicone for joints interfacing plumbing and electrical boxes (villa utilities).
- Environmental standards: Maintain application environment per microcement supplier datasheets; verify adhesion via pull-off strength ≥ 1.0 MPa on prepared substrates.
- Compatibility: Confirm with underfloor cooling/heating (rare in Bali but possible); respect movement joints and isolation joints at columns and thresholds.
Where local regulations apply, Teville aligns methods with international benchmarks (ASTM/EN) and adapts details to Bali’s climate. Product selection is validated via on-site mockups and test areas as part of our portfolio delivery standards.
Step-by-Step Process
1) Assessment and testing
- Survey substrate integrity, level, falls, and joint layout. Identify previous coatings and contamination.
- Measure moisture (in-situ RH probes) and note salt exposure risk. Plan moisture mitigation or waterproofing if required.
- Define interfaces: door thresholds, skirtings, drains, floor boxes, built-in furniture plinths, and appliance locations.
2) Surface preparation
- Mask adjacent finishes. Diamond-grind to CSP 1–2; remove dust with HEPA vacuuming.
- Repair cracks and holes; route, fill with structural epoxy/PU; feather with repair mortar.
- Unstable tiles: remove and patch; sound tiles: degrease, abrade, rinse, dry.
- Establish or verify falls in wet zones using patching or levelling compounds compatible with microcement.
3) Moisture mitigation and waterproofing
- If RH exceeds limits, apply moisture-tolerant epoxy primer with silica broadcast to refusal; cure as specified.
- Install waterproofing membranes in showers, wet rooms, and splash zones; form coves and upturns; detail all penetrations with collars/gaskets.
4) Priming
- Apply appropriate primer (epoxy-sand for non-porous; acrylic for absorbent). Ensure uniform, pinhole-free coverage.
- Allow full dry; avoid condensation by conditioning air and monitoring dew point.
5) Base coat with mesh
- Mix microcement base per datasheet; rest (slake) if required.
- Trowel a thin base coat; embed fiberglass mesh on critical areas; overlap mesh by ≥50 mm.
- Let dry; sand lightly to remove ridges; vacuum thoroughly.
6) Second base coat
- Apply a second base coat to achieve flatness and uniform coverage; maintain consistent trowel angle to reduce burnish.
- Dry completely; sand 120–180 grit; vacuum.
7) Finish coats
- Apply first finish coat (fine grain), working wet-on-wet edges for seamless appearance; control lighting to read trowel patterns.
- After drying, denib with fine abrasive. Apply second finish coat, refining texture to target slip and sheen after sealing.
8) Detailing and interfaces
- Neatly finish to trims and thresholds; protect drain edges and floor boxes with removable covers.
- Form neat terminations behind skirting lines or custom microcement skirtings for a monolithic look.
- At furniture installation zones, specify protective sheets until full cure; coordinate with joinery teams.
9) Sealing
- Ensure surface is dust-free; apply first sealer coat by microfiber roller; observe recoat window.
- Apply second and optional third coat for higher chemical and stain resistance, selecting matte or satin per space.
- Verify slip resistance on site (especially in wet areas) and adjust microtexture or topcoat selection as required.
10) Curing, protection, and handover
- Condition space to RH ≤ 65% and 20–30°C. Light foot traffic after 24–48 hours; full cure often 5–7 days before heavy furniture.
- Install utilities trims and silicone after sealer cures. Fit felt pads under furniture feet.
- Provide maintenance guide; schedule first inspection post-handover, especially in coastal villas.
Teville coordinates sequencing with other trades to avoid contamination or damage, integrating microcement into the broader construction process and aligning with the villa’s utilities plan and furniture delivery to maintain finish quality.
Costs & Timeline
Budget ranges (Bali, 2026)
- Standard interior floors/walls (sound screed, minimal repairs): IDR 800,000–1,400,000 per m².
- Complex substrates (tile overlay, moisture mitigation, heavy repairs): IDR 1,400,000–2,200,000 per m².
- Wet rooms with waterproofing, coves, and high-spec sealer: IDR 1,800,000–2,800,000 per m².
- Detailing (custom skirtings, trims, mockups, on-site slip testing): add 5–15%.
Costs vary with substrate condition, area size, color consistency requirements, slip resistance targets, and environmental controls. Request an itemized estimate via our cost estimation form to align scope and specification.
Typical durations
- Preconstruction (samples, mockups, approvals): 3–7 days.
- Surface prep and repairs: 1–3 days (small projects); 3–5 days (larger/complex).
- Microcement application (4 coats + sanding): 3–5 days depending on area and RH.
- Sealing (2–3 coats) and initial cure: 1–2 days.
- Full cure before furniture installation: 5–7 days, extend in high humidity.
For a 70–120 m² villa interior, plan 7–14 working days on site, plus cure periods. Teville phases work to minimize overlap with dusty trades and to protect finishes during furniture installation and utilities commissioning.
FAQ
 164 m²7 month(s)from 79.000 USD
TALA TWO
 3127 m²9 month(s)from 177.000 USD
Mukunda
 3180 m²7 month(s)from 142.000 USD
Vasudeva
 3104 m²11 month(s)from 99.000 USD
TALA 100
 3173 m²6 month(s)from 125.000 USD
TALA FOUR
 2144 m²11 month(s)from 104.000 USD
Narayana

Want to calculate?
 172 m²8 month(s)from 120.000 USD
Keshava
 4344 m²16 month(s)from 290.000 USD
Radha
 1from 198.000 USD
Private: Haridas Villas
 3124 m²6 month(s)from 123.000 USD
TALA 8
164 m²7 month(s)from 79.000 USDPrivate: Haridas Villas, Tegallalang
Start With Real Numbers, Not Guesses
Before finalizing your finishing works plan, check realistic cost ranges for your Bali villa project.
Available lands
 700 m²15 min$ 90517Bali, Central Bali
 2000 m²15 min$ 523000Bali, Canggu
 700 m²20 min$ 90517Bali, Cepaka
 2230 m²15 min$ 410573Bali, Padonan
 585 m²8 min$ 165702Bali, Mengwi
 1350 m²5 min$ 283467Bali, Pecatu
 500 m²15 min$ 124692Bali, Kaba Kaba
 1000 m²10 min$ 184729Bali, Kutuh South Bali
 3700 m²15 min$ 738177Bali, Tabanan
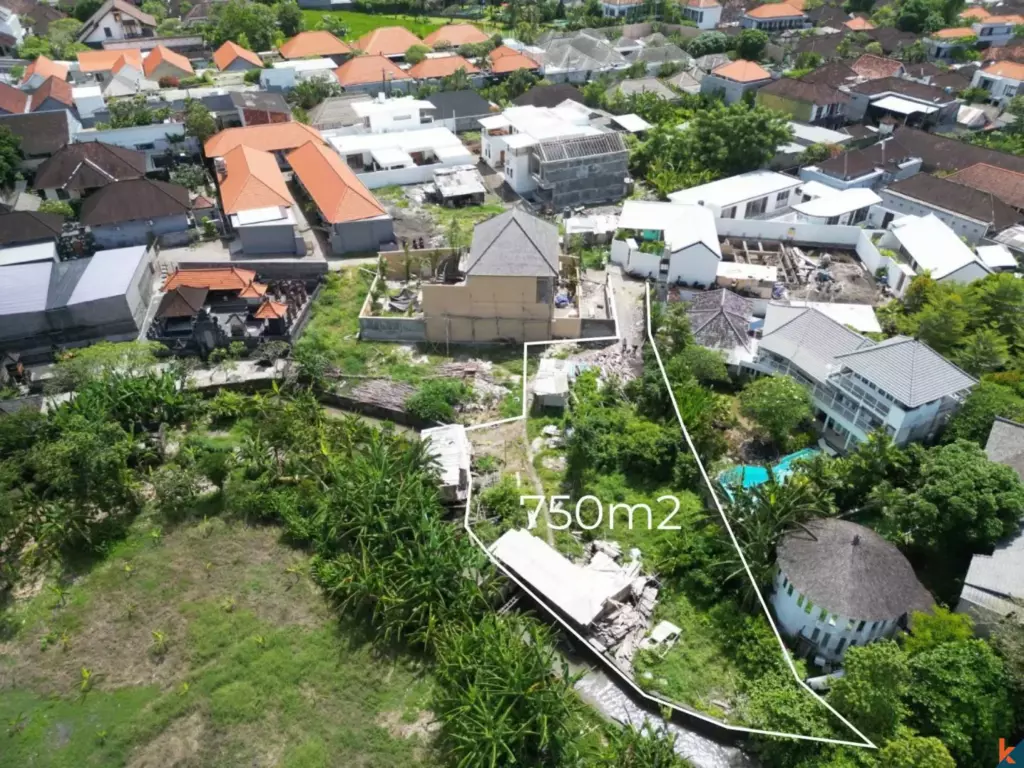 750 m²15 min$ 187038Bali, Kerobokan
 7500 m²5 min$ 206281Bali, Kedungu
 2400 m²7 min$ 496552Bali, Canggu
 13000 m²1 min$ 920567Bali, Pekutatan
 1430 m²5 min$ 209862Bali, Klungkung
 2800 m²15 min$ 310345Bali, Tabanan
Planning a build in Bali?
Get a feasibility view, budget range and timeline from Teville.
Related guides

Marine-Grade Fixings for Bali Joinery: Corrosion Protocols
Explore marine-grade fixings and corrosion protocols for Bali coast joinery. Learn materials, maintenance tips, and best practices to extend timber durability.
10 min read
Resin-Infused Plaster Finishes: Anti-Salt Systems Bali
Expert technical guide: Resin-Infused Plaster Finishes: Anti-Salt Systems Bali
8 min read
Prefinished Timber Joinery: Silicone Seals Fixings Bali
Professional prefinished timber joinery installation in Bali with silicone seals and fixings for durable weatherproof performance and a premium finish.
10 min read